Simulating setState: A Hands-On Guide to React’s Inner Workings

Full-stack developer with a passion for Web3, React, Laravel, and more. I love crafting beautiful and functional web and mobile applications, and am skilled in Typescript and technical writing. My focus is always on giving and making a positive impact.
React has captured the attention of many developers, including myself, and for curious individuals like myself, it’s natural to delve deeper into the creation of this “timeless way of building user interfaces.”
Understanding the workings of setState in React is crucial for developers of all skill levels to improve their knowledge and understanding of the framework. This article will guide you through how setState operates. It’s important to keep in mind that the code examples in this article are just a simulation of how setState works in React and do not incorporate all the optimizations made by the talented React team and community. The code examples presented here may not cover all cases of setState and should not be used in a production environment.
The Concept of State in React
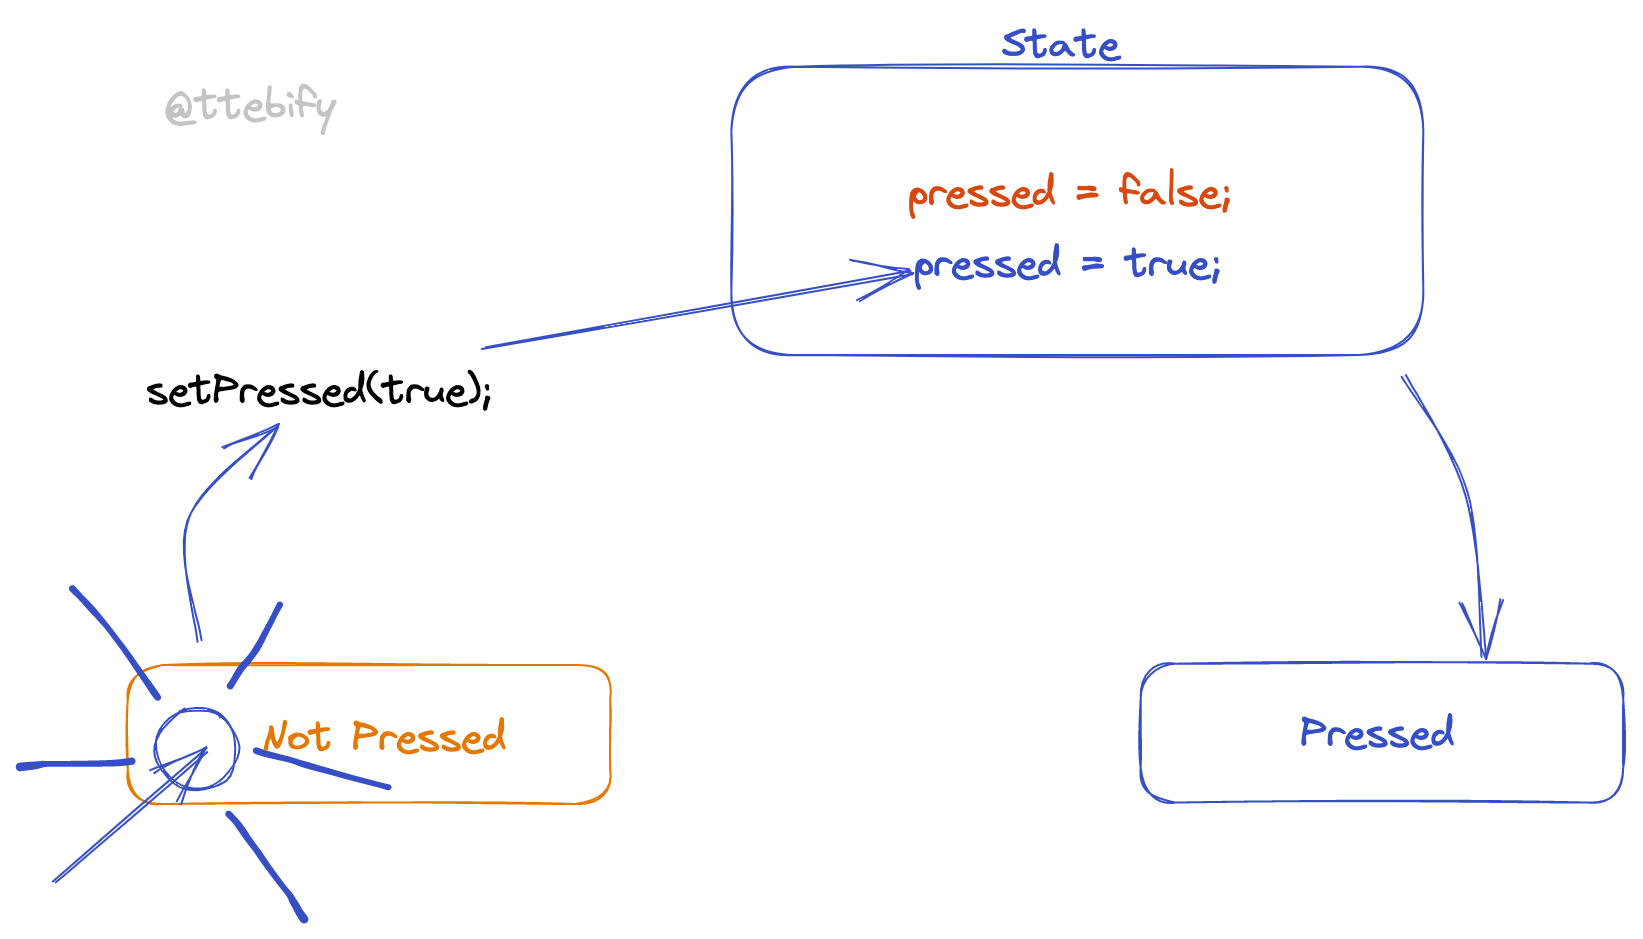
One popular and intuitive way to explain the concept of state in React is to consider it as a “memory” for components. Components need to store information, such as the current count value when you click on a counter, the currently selected image, or the current item in a cart. These states are isolated and private, meaning that each instance of the same component has its own copy of its state.
When the state changes, React re-renders the component. In other words, React calls the component again (like functions). This process of re-rendering can be triggered by various factors, such as a change in the component’s props. However, it’s important to note that states are separate from props.
The useState Hook
To utilise the state management feature of React, you typically import the useState hook from the React library. This hook, along with other hooks provided by React, is a unique function that is only accessible during component rendering. It enables you to integrate with React and allows it to manage a state for your component. Here’s an example:
import React, { useState } from 'react';

function Example() {
  const [count, setCount] = useState(0);

  return (
    <div>
      <p>The count is {count}</p>
       {/* Trigger a state update 👇*/}
      <button onClick={() => setCount(count + 1)}>
        Increment
      </button>
    </div>
  );
}
In the example, useState is called with an initial value of 0 for the count. It returns an array with two values: count, which is the current state value, and setCount, which is a function used to update the state. When the Increment button is clicked, the setCount function is called with a new value of count + 1. This triggers a re-rendering of the component, and the updated count value is displayed.
Before exploring the implementation of setState in React, it’s crucial to discuss the importance of using setState over direct state manipulation.
It is recommended to use the setState method instead of direct state manipulation in React for several reasons:
SetState is asynchronous, meaning multiple calls are batched into a single update, improving performance and avoiding unnecessary re-renders. Direct state manipulation triggers an immediate update.
SetState ensures consistency in state updates, allowing React to accurately render components based on the latest state. Direct state manipulation can cause inconsistencies and unexpected results.
SetState is reactive, triggering a component re-render when the state changes, keeping the component updated and reflecting the latest state. Direct state manipulation does not trigger re-renders.
SetState leads to reusable and predictable components, making them easier to maintain and test. Direct state manipulation can result in complex, hard-to-maintain components.
In conclusion, setState is the preferred method for managing states in React, as it ensures updates are performed in a consistent, predictable, and reactive manner.
Implementing useState Simulation
We are going to start by calling this function “useSimulatedState” and the function will be used like this:
const [count, setCount] = useSimulatedState(0);
First draft of the function.
import { useEffect } from "react";

type RenderStack = () => void;

function useSimulatedState(initialState: any) {
 let state = initialState;
 let renderId = 0; // Keep track of number of renders

// Store state updates that need to be applied
 const renderStack: RenderStack[] = []; // Holds an array of functions

 function setState(newState) {
   // Push a function onto the renderStack that updates the state variable
   renderStack.push(() => {
     state = typeof newState === "function" ? newState(state) : newState;
     renderId++;
   });
 }

 useEffect(() => {
   if (renderStack.length > 0) {
     const nextRender = renderStack.pop();
     if (nextRender) {
       nextRender();
     }
   }
 }, [renderId]);

// This returns the touple used when calling useSimulatedState
 return [state, setState];
}
In this implementation, we’ve added a renderStack array to store state updates that need to be applied. The useEffect hook is used to apply the state updates and trigger a render. The renderId variable is used to keep track of the number of times the component has been rendered, and the useEffect hook is set up to re-run only when renderId changes.
When the setState function is called, it pushes a function onto the renderStack that updates the state variable. The useEffect hook will then pop the next function from the renderStack and execute it, updating the state variable and incrementing the renderId. This will trigger another render, which will repeat the process until there are no more functions left on the renderStack.
The Role of the Render Stack in Maintaining Consistency in React Components
The render stack is a crucial concept in understanding how React works. In React, when a component is updated, it is re-rendered, and the process of re-rendering is managed through the render stack.
A render stack is a queue of component updates that need to be processed. When a component is updated, its update is added to the render stack. React then processes the render stack in the order in which the updates were added. The component is then re-rendered, and the updated result is displayed on the screen.
The render stack helps ensure that component updates are performed in a controlled and predictable manner. It prevents multiple updates from occurring simultaneously and interfering with each other, and it ensures that updates are performed in the order in which they were requested.
In addition to managing the order of updates, the render stack also helps to avoid unnecessary re-renders. React will only re-render a component if the component’s state or props have changed. If the state or props have not changed, the component’s update will be ignored, and the component will not be re-rendered.
In short, the render stack is a crucial concept in React that helps to manage component updates and ensure that they are performed in a controlled and predictable manner while avoiding unnecessary re-renders.
The example we have above attempts to implement a custom hook called “useSimulatedState” that mimics the behaviour of React’s built-in “useState” hook. However, this implementation is not going to work as intended for several reasons:
The “renderStack” variable is not part of React and is only used to explain the concept of how state updates are executed in a batch. In real-life React applications, this kind of internal mechanism is managed by React itself, and it is not possible to access or modify it.
The “useEffect” hook used in this implementation only executes the next render in the “renderStack” if there are items in the stack. However, this approach is not sufficient to guarantee that state updates are executed in the correct order, as React’s batching mechanism ensures that multiple state updates are executed in the correct order, even if some of them are executed asynchronously.
The use of the “renderId” variable to trigger the effect is also not sufficient to guarantee that the effect is executed whenever the state changes. In React, effects are only executed if their dependencies change, and the “renderId” variable alone does not reflect the changes in the state, as it only increments whenever a state update is executed.
In conclusion, this implementation is not a correct or functional implementation of the “useState” hook and should not be used in real-life applications. Instead, the built-in “useState” hook should be used to manage states in React applications.
Implementing useState Without useEffect
We can even go a step further by simulating the useState hook. In our implementation, we used the useEffect hook from React, which causes a re-render when the renderId changes and continues to run the nextRender function until there are no more updates. Now let’s write our own implementation;
Here’s an updated implementation of the setState hook in React that does not use the useEffect hook from React and instead simulates its behaviour:
type RenderStack = {
 rendering: boolean; // keep track of whether a render is currently in progress
 stack: (() => void)[];
};

function useSimulatedState(initialState: any) {
 let state = initialState;
 let renderId = 0; // Keep track of number of renders

// Store state updates that need to be applied
 const renderStack: RenderStack = { stack: [], rendering: false };

 function setState(newState) {
   renderStack.stack.push(() => {
     state = typeof newState === "function" ? newState(state) : newState;
     renderId++;
   });

   if (!renderStack.rendering) {
     renderStack.rendering = true;
     while (renderStack.stack.length > 0) {
       const nextRender = renderStack.stack.pop();
       if (nextRender) {
         nextRender();
       }
     }
     // All renderings are done, set rendering back to false
     renderStack.rendering = false;
   }
 }

 return [state, setState];
}
In this implementation, the state updates are managed using a render stack, which is an object with two properties: stack and rendering. The stack property is an array of functions, each of which updates the state in some way. When setState is called, the update function is pushed onto the stack.
If the rendering property is set to false, the hook starts rendering the updates by popping functions off the stack and calling them one by one. When all updates are done, the rendering property is set back to false.
This simulation of the useEffect hook allows us to handle state updates and re-render them in a similar way to how React handles them. However, it is important to note that this is a simplified version that may not handle all use cases correctly and may not be optimised for performance. In a real-world implementation of React, these optimizations would be built into the core library.
Conclusion
In this article, we have discussed the inner workings of setState in React. We explained why understanding setState is crucial for developers of all levels who want to improve their React skills and knowledge. The article also covered the concept of states in React and the difference between a state and a prop. Additionally, we demonstrated how to simulate the useState hook in React and provided a custom implementation of setState without using the useEffect hook.
To continue learning about React, it is recommended to dive deeper into the documentation and other resources and to experiment with building applications that utilise the setState hook.
Follow me (Justice Ekemezie ) on Hashnode for more interesting articles and insights on the world of technology and beyond.
My other social Links:

